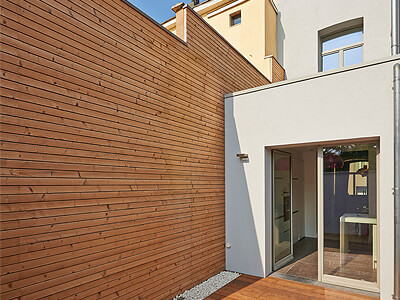
Like all construction projects, building a fence takes time, careful planning, and hard work. However, the result is something that can last for years, and may add value to your property, enhance recreation space, or give an outside area a newly designated purpose.
If you have decided to build a fence, you'll need to first weigh up why you want one, and what its ultimate purpose will be.
You'll need to consider:
- How the fence will influence your house or garden aesthetically.
- What requirements do you want your fence to meet?
- Do you want it for:
- Security
- To demarcate an area
- To keep animals in
- To keep animals out
- To protect vegetable gardens
- To keep children safe
- To separate properties
- The impact a fence will have on light and shadow
- If it should allow light through or be used to block the light
- If a new fence will prevent access in any way
- If privacy is a priority
If you are building a fence that has any impact on your neighbours, you should also discuss your construction plans with them. It's only fair that they have some input if it will change their property or outlook, too.
If you're lucky, they may have some good ideas, or even be willing to share the costs.
Planning Permission
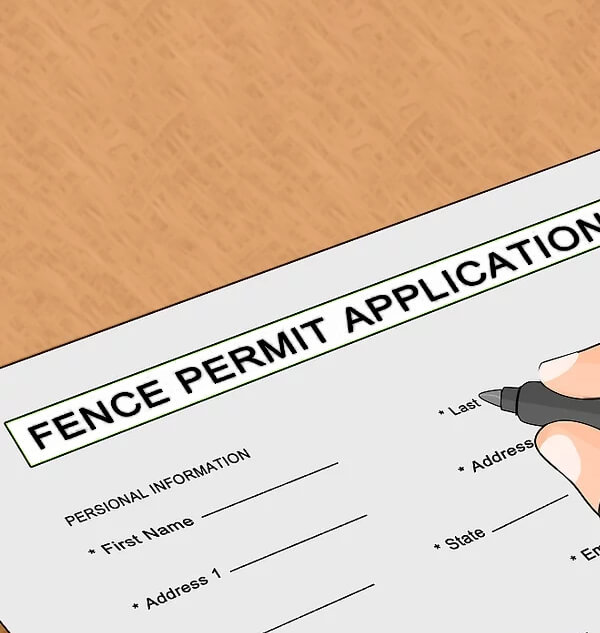
If you are planning on building a fence, you may need permission or a permit. Before you proceed, check with the local council or authorities about the requirements so that you stay within the law. You don't want to go to all the effort of building a fence only to have to tear it down due to not following the proper planning procedures.
Now that you've got all the planning and purposes of your fence covered, you need to consider what kind of fence will best suit your situation.
You can divide the types of fences into 4 different options:
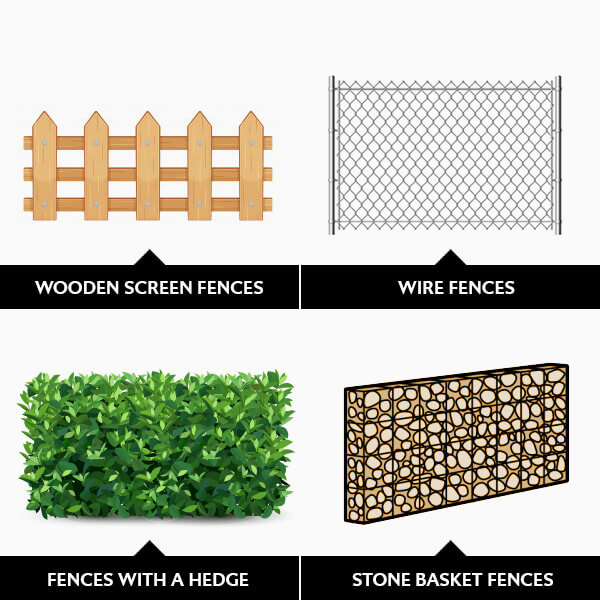
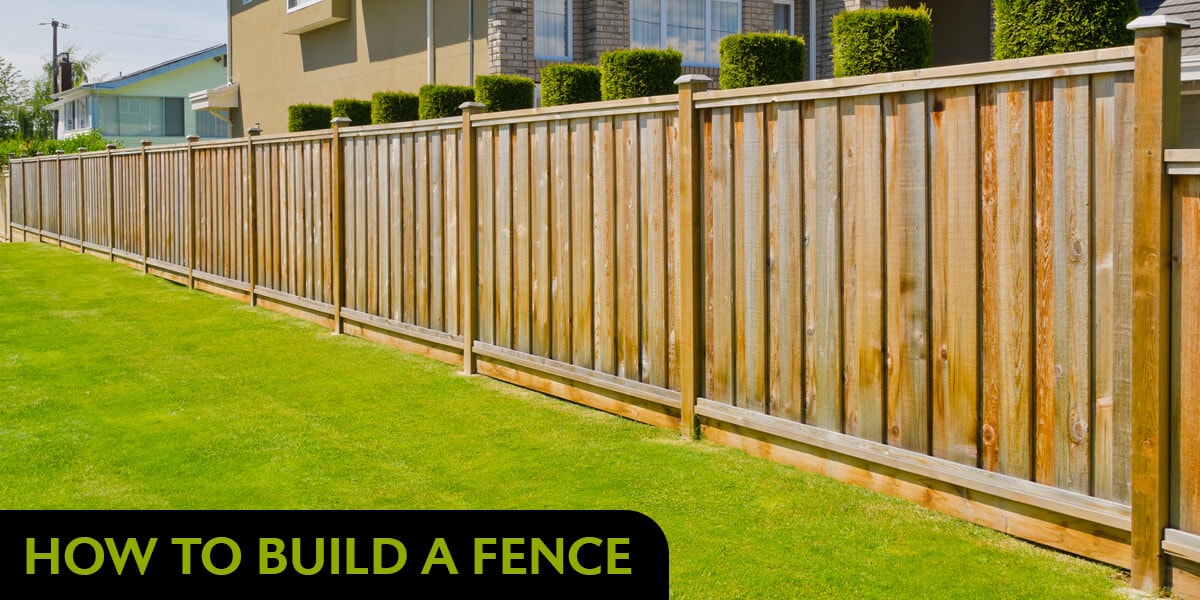
1. Wooden Screen Fences
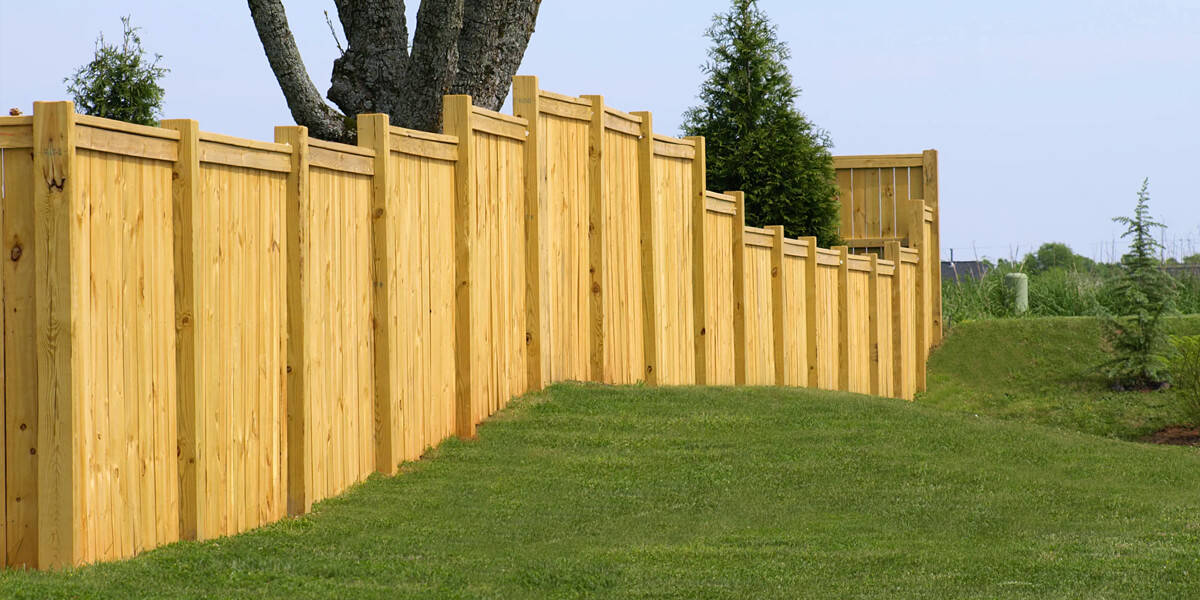
The most popular type of fence is a wooden one with slats or solid wooden partitions. If you opt for solid partitions, consider the fact that the fence will not allow wind to pass through, which is important if strong winds are going to be a factor.
As wood is a natural material it fits in well in gardens and can be treated in natural colour to blend in with surroundings or painted as a feature to stand out.
Wood is also very versatile, and you can have designs cut out or carved into it, add spacings to let in more light, or create lines that are curved rather than dead straight. There are also numerous different types of wood that can be used, and the varying options for hardness allow you to choose just how solid a fence you build. If you need the fence to withstand the impact of a dog jumping against it or children kicking balls at it, the harder woods are going to be your best option, as they will last the longest.
Wood is also a cost-effective choice as you can select a cheaper type of wood if desired and can budget depending on the height you are building and the length required.
One important tip to remember with wood is that it does take some care to keep it in tip-top condition. You may need to oil, seal, varnish, or paint it on an annual basis, especially if it is exposed to harsh sun, strong wind, rain, sleet, and snow. The better you maintain a wooden fence, the longer its lifespan will be, and the less chance it has of rotting, splintering or decaying.
2. Wire Fences
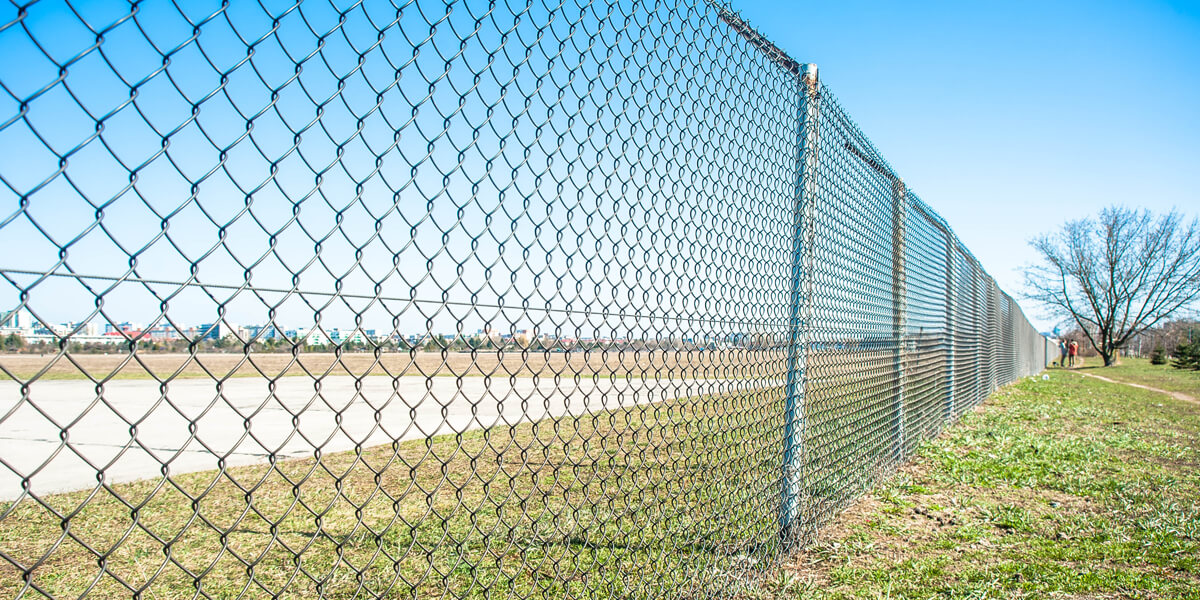
If you're looking for quick and easy installation and are not too concerned about aesthetics, a wire fence is your best bet. One of the easiest, low-maintenance and most cost-effective options, a wire fence can create an almost instant barrier.
It must be remembered that a wire fence is not necessarily as strong as a wooden one and may be prone to rusting over time. It can also fall over easily in strong winds may even start to form holes when it corrodes. It can, however, be patched with wire.
You can choose from different size wire meshes for a fence depending on your criteria, but if you are trying to keep animals in or out, you need to go for a very small, tight mesh, as they can often squeeze through much smaller gaps than anticipated.
3. Fences With A Hedge
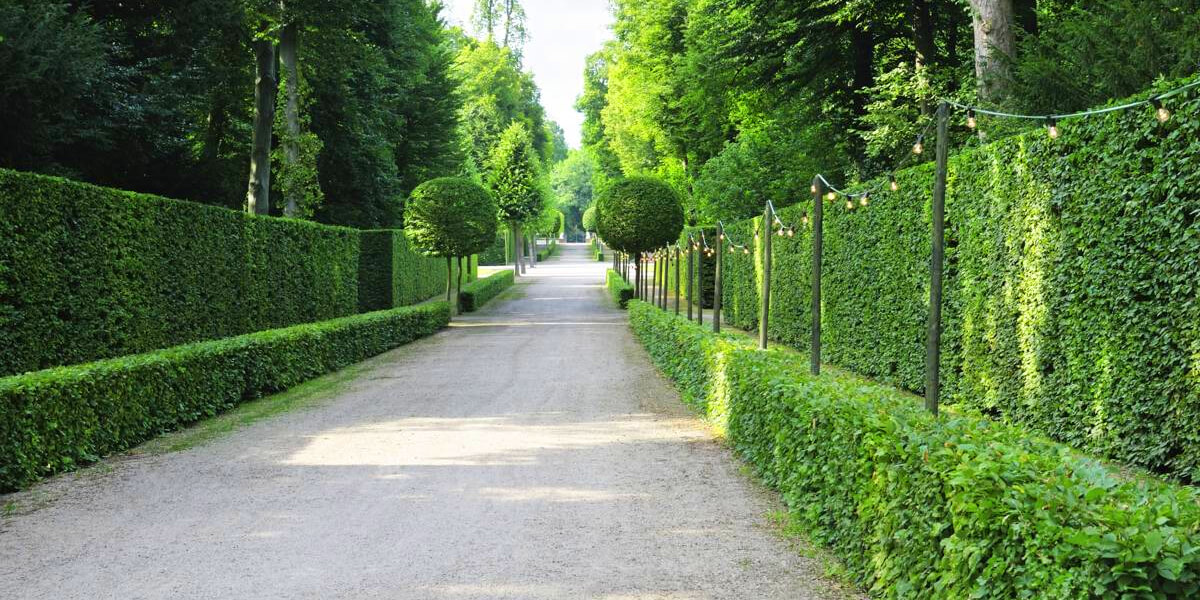
If you want to create a very natural-looking barrier and are not concerned with keeping animals or children in or out, a natural hedge fence is a great choice. You must remember that if you go the natural route, the height of the fence will change over time, so what you plant initially may take some time to reach its full height.
There are also plenty of high-coverage shrubs and trees to choose from, and some may even bear fruit or during the season. Conifers Leylandii, Holly, Inkberries and Blackberry all make great hedges, as do Beech, Pine and Portuguese Laurel. Before planting a hedge, do some research into which plants will work best for your geographical location. Some plants cope better in coastal areas, others need more sun, and some prefer dry air and wind.
For an added layer of protection, you can consider building a wire fence behind your planted fence, as this will keep unwanted visitors out.
4. Stone Basket Fences

Fences made with baskets of stones bound together have grown in popularity because they provide a natural-looking barrier that is hard to penetrate. They are also ideal for uneven surfaces as they can sink in and be "moulded" according to the shape of the land. A strong foundation is, however, required, as you don't want the baskets to shift or fall at any stage.
Stone basket fences can be made with whatever material is available, and large boulders, smaller stones or even pebbles can be used. Tree bark or logs are also an option, except they can degrade over time as they soften and decay.
Basket fences are also modular, so they can be built up, added to, or even changed as needed. They can be used in stepped gardens to form their steps or even as seating that doubles up as a fence. They are incredibly versatile, but filling the baskets is not always cost-effective and can be very labour intensive.
Building a Wooden Fence
Now that you know all about what to consider before you build a fence and what your options are, let's cover the basics of the actual construction process. We've focused on a wooden fence, but the principles applied here can be used in just about any other fence construction, regardless of what material you have chosen to use.
Assembling Your Tools and Construction Materials
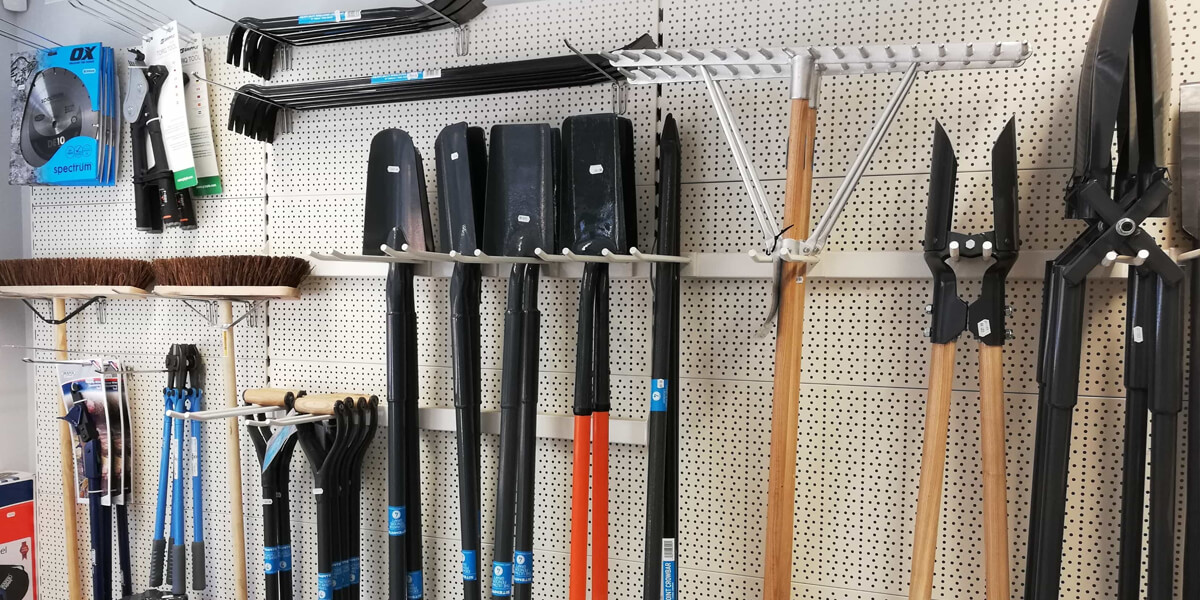
Planning is crucial when building a fence, and before you begin, you'll need to draw up your plan, make accurate measurements, and have all the required tools and construction materials.
Buildworld has everything you need for fence construction, from tape measures to wooden posts and all the timber required to complete a successful project.
QUICK TIP:
Why Double Vertical Planks are a Good Choice
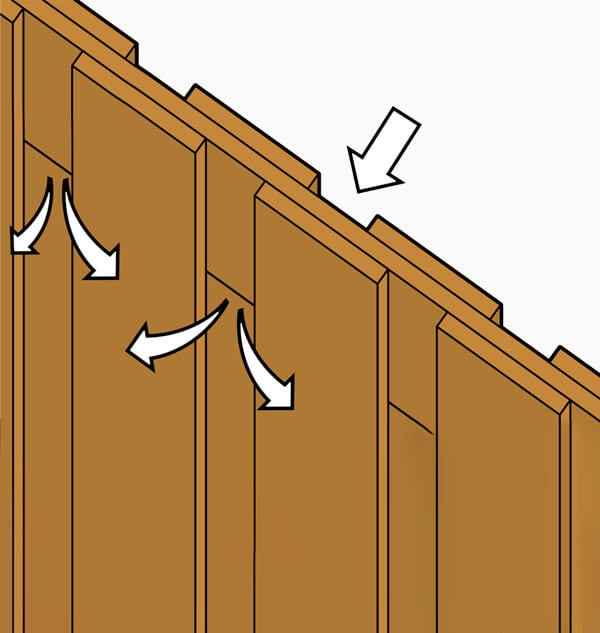
Double vertical planked fences are just about the prime option for a fence that offers privacy yet allows the wind to pass through. This means the fence has to put up less resistance and will not be as prone to damage from high wind speeds.
If you need some guidance with measurements for this type of fence, we recommend horizontal planks of 1.8x14.5x400cm, vertical planks of 1.8x14.5x180cm and posts that are 6.8x6.8x270cm. This will create a sturdy yet attractive fence that can suit just about any purpose.
Once you have everything you need cut to the correct lengths, you can begin.
Setting Up The Area

When you have decided exactly where you want your fence, you need to carefully mark out the area. You can use a tape measure to do this, and you can make marks using chalk, stones, cones or any other object that you can fix on the ground and won't move. Once you have finished your set-up, use the cord to create a fixed outline and ensure your posts are kept in line.
Then, you need to level the ground as best as possible unless an uneven build is part of your plan. A spirit level will help you out here, and you can easily determine just how to level the ground quickly and easily.
Once you have completed the basic measurements for the outline of your fence and have flattened the ground out, you can determine where the end and centre posts will be. Working from the outside in, you can work out where your remaining posts need to fit in at equal points.
Your end posts should be placed at the ends of horizontal planks, which are 4 meters in length. Once these are sawn, you can mark out the fence height of 1.8m and proceed to the next step.
Setting Up Plank Spacing
The spacing of your planks is critical to a professional finish, and you may need to measure a few times to make sure that every single plank is perfectly positioned.
You can place the fence posts 4 meters apart and then position the intermediate posts every 2 meters. Once this has been done, check that your measurements line up, as sometimes the planks may move slightly and throw your entire project off.
All your vertical planks should have the same spacing between them and be 4 meters apart. Once you have these in place, you can fit all the planks on the other side of the fence, filling the gaps that were created during your initial construction.
To secure the vertical planks in place you'll need to fit 3 cross beams to the posts on one side. These beams will fit in at the top, middle and bottom. You can use planks that are the same size as the vertical ones, but their length will differ. Once these are in place, you'll screw them to the cross beams that are running horizontally.
IMPORTANT QUESTION:
How Many Planks Will Your Fence Need?
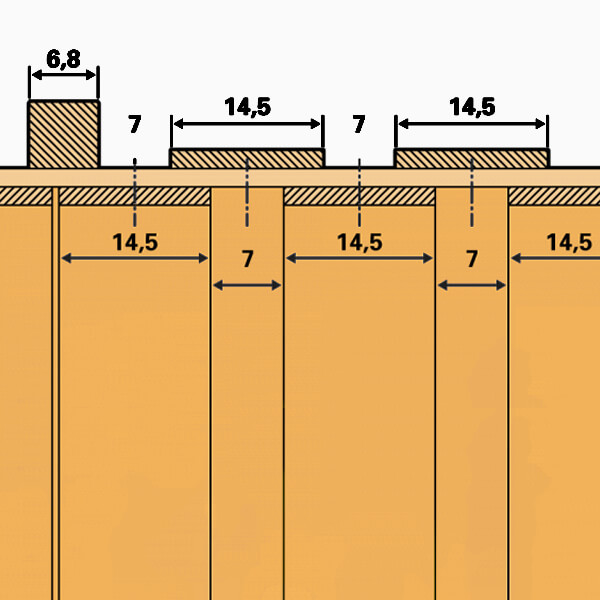
Calculating how many planks are required is part of the planning process, but if your fence is 1.8 meters high and you use 1.8 x 14.5cm wide planks with spacings of 7cm apart, you'll have to have 5 planks per meter in front, and 4 planks per meter at the back. This means you'll need a total of 9 planks for every meter of fence.
If your fence is 12 meters long, you'll need 9x12 planks to meet your requirements on a vertical scale. This equals 10 vertical planks that are 1.8m in height each.
For the horizontal cross beams, you'll need 3 planks each of 4 meters per top, middle and bottom section. A 12-meter-long fence will comprise of 3 sections, making a total of 9 horizontal planks of 4 meters each required.
It is important to accept that when building a fence, especially with wood, accidents happen, and even the most experienced builders have to allow for a margin of error. To this end, it's suggested that you allow for a few extra planks to cover any unexpected issues and that you don't only have the exact amount of wood needed to complete the perfect project.
How Many Screws Will You Need?
This question is a bit like asking how long a piece of string is. Some builders prefer to use more screws, while others may need less. We've calculated the ideal number for this project, but be prepared that you may need more to complete the job.
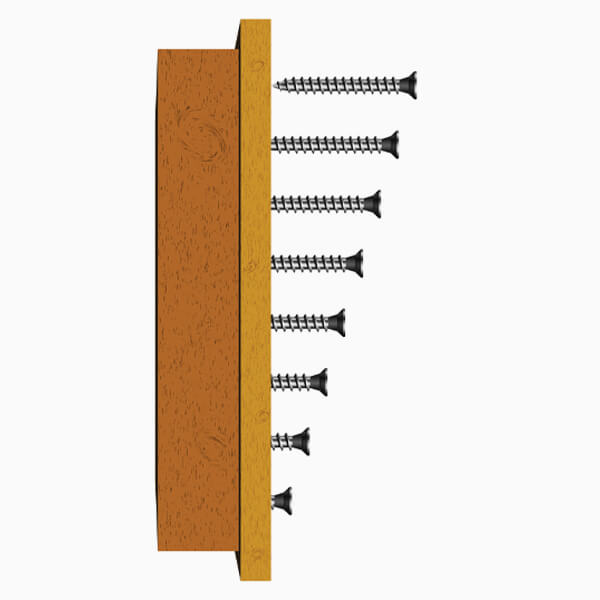
To fix the planks in place you'll need 4x30mm stainless steel screws. Then, to fix the cross beams in place, 3 x 3 screws are needed for each plank x 9, equalling a total of 81 screws. For the vertical planks, you'll need 108 screws x 3, totalling 324. This means that best-case scenario, you'll need 405 screws to complete the fence, but the chances are you may well need a few more!
Marking Out
To mark the fence posts, use smaller posts or pegs outside the cord measurement you have set up. This is done because once you start digging your foundations, any markings on the cord will be covered, and by laying the posts outside of these to indicate spacing, you can easily keep track of the measurements.
Just make sure you don't put the posts too far off the edge of the cord, as you may move them even a few centimetres when bringing them back in, and this can throw your whole measurement out.
QUICK TIP:
While it is possible to build a fence on your own, having someone to help you will go a long way to making the construction process easier. When you're measuring the area, they can help ensure that you keep the cord straight, assist with holding planks in place while you screw them in and lend a hand with just about every part of the project.
A second person can also add extra muscle power, especially when driving the planks into the ground.
Digging The Post Holes
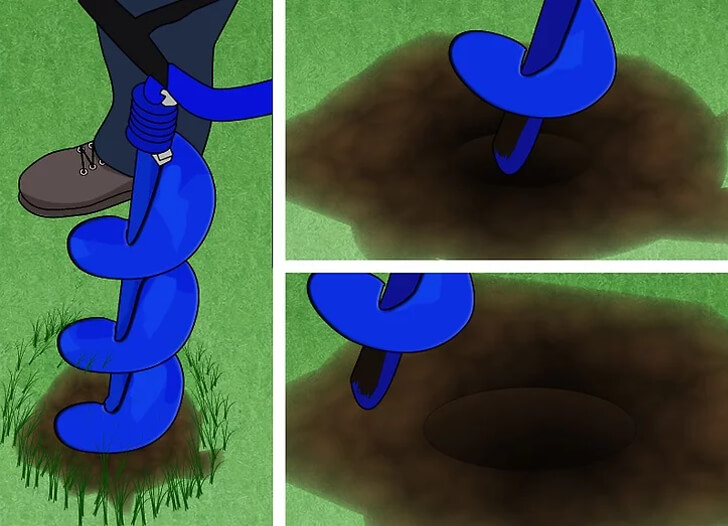
When you are ready to dig the holes for the posts, start at the corners. You can use a narrow spade or ground drill to go down between 60 and 80cm deep. Depending on the terrain, you may need heavier-duty equipment or more force.
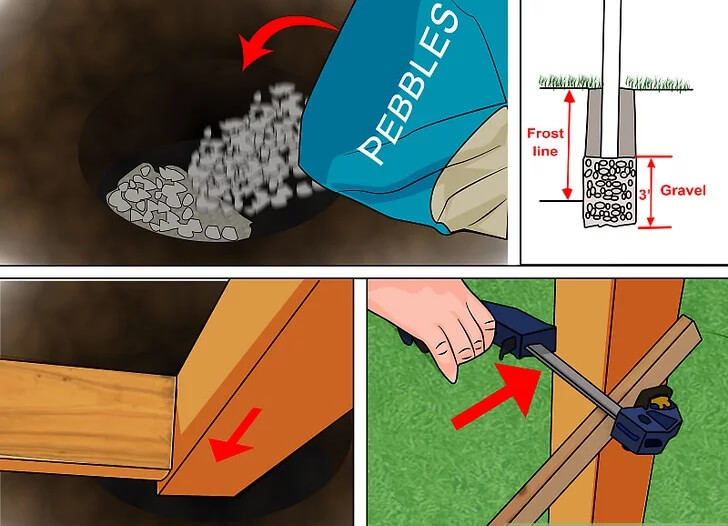
If you hit a rock, you may need to reconsider your positioning, and if the soil has a very high water table, you may need to look at filling the holes with concrete or stones to create a sort of sheath for each post. Alternatively, you can opt for galvanised post holders that you drive straight into the ground and slot the posts into.
If the ground is very dry you may need to moisten it to make it easier to dig down, and if there's clay, you should try to go as deep as possible to hit a more solid foundation.
Ensuring Posts Do Not Rot
It's a fact that you cannot ignore. Wood, especially when wet or damp, is prone to rotting and will eventually disintegrate. To stop your posts from rotting under the ground, you'll need to treat them before you dig them in. If you can treat the entire post, and this ties in with your final finish, that's first prize, but otherwise, treat the posts up to at least 10cm above the ground's surface.
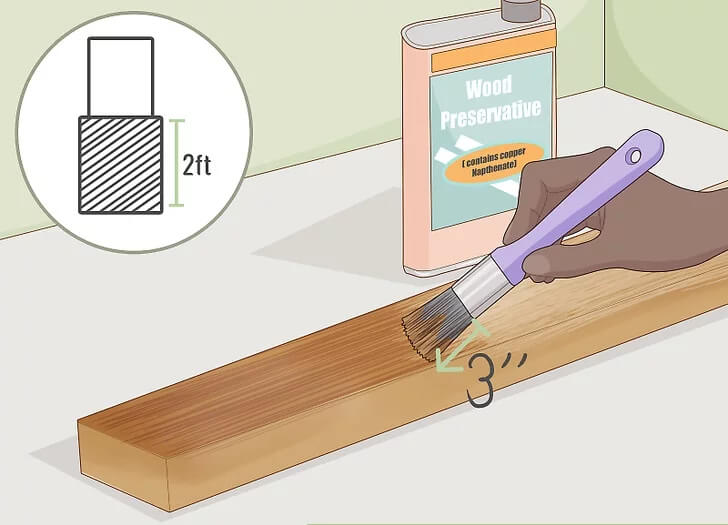
There are several different treatment options available, and you can chat with us at Buildworld to determine which one is best. Acrylic resin, wood preservatives or even bitumen-based products are the most commonly used options, and each provides an almost impenetrable layer of protection. You can also place the posts in PVC pipe, but moisture may still get in around the sides, so if you do this, try to treat the wood first so you have a double layer of rot protection.
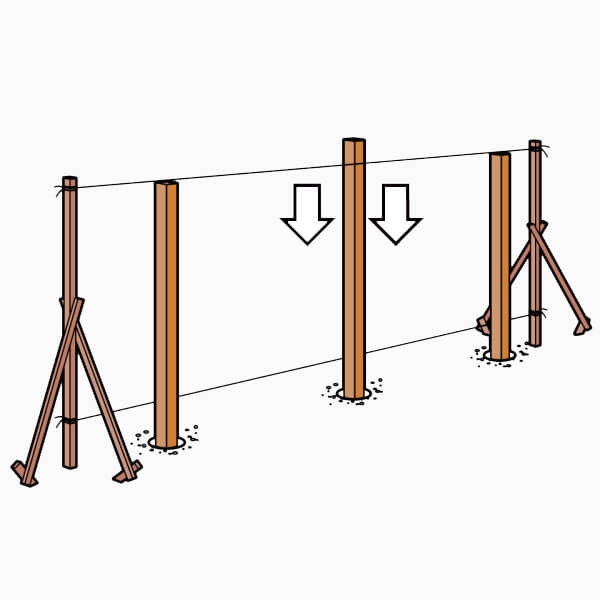
Placing The Posts
This is when the real work begins!
Place the first post in a hole on the centreline of your marking. Using a sledgehammer, drive the post straight into the ground. If needs be, you can use a step ladder to position yourself above the post and get enough leverage. You'll need to drive the post into the ground until it is level with the cord you set at the height measurement.
QUICK TIP:
It's at this stage when your posts can start going out of alignment, as often when driving them into the ground they tilt one way or another. Use a spirit level to check that they are in straight, and if they have gone out of alignment, try to hit them back into place, or remove them and start again. You can also use an adhesive clamp at the centre to pull them back if they are only slightly off, but this can compromise the hole you dug to position them in and may make them wobbly and harder to work with.
SAFETY FIRST:

Always wear gloves when working with wood or doing any form of construction. You need to protect your hands from splinters and any other debris that could cause injury. Gloves are a must in every toolkit, and if you are using an electric saw, you should wear goggles to protect your eyes, too.
Pouring the Concrete
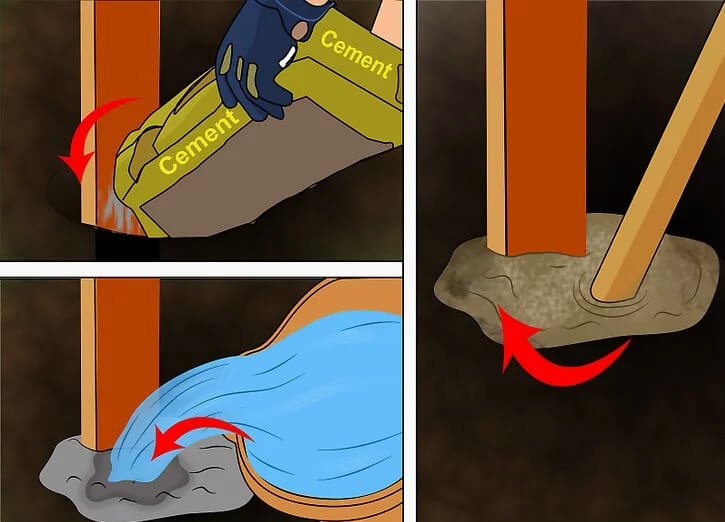
Once your posts are all in place and you have checked they are straight and level, you are ready to pour the concrete into their bases.
Concrete should be mixed in a wheelbarrow or on a surface that can be easily washed and not on soil, as it can leach into the ground.
You'll need 1 kilogram of course builders' sand, 1 kilogram of gravel, and 0.5 kilograms of cement for this job. Alternatively, you can buy a quick-drying mortar and pour it directly into the hole and then add water. If you do this, make sure the mortar and water t mix properly, as if they don't, they won't provide a stable foundation.
When you've poured your concrete into each of the post holes, check that they are plumb again, as they may have shifted slightly. Building a fence requires constant vigilance from the first post to the last.
Adding Intermediate Posts
When you have successfully completed the first set of posts, you are ready to begin adding the intermediate ones.
You'll now need to place the intermediate posts along the centre of the fence line, following the markings you made on the cord and the ground. You must also check that these posts are in line before concreting them in place, just like you did with the primary supports.
QUICK TIP:
When adding the intermediate posts, a spirit level is your friend. You can make sure that they line up perfectly with this tool and can shift them around if need be. If you end up with some posts that are not level and stand taller than others, you can always saw them down a little to match.
Fitting Horizontal Planks
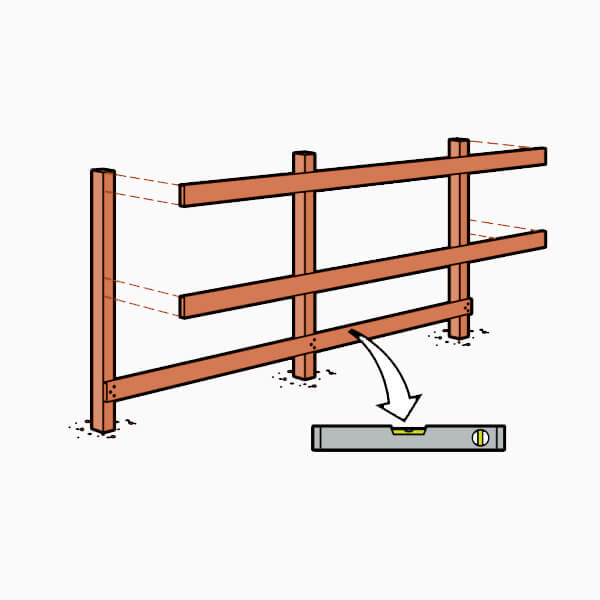
Now your wooden fence is starting to take shape, and it is time to add the horizontal planks in place.
Always start at the bottom and work all the way to the end, then go to the top and, lastly, the middle. Screw your horizontal plank into place just above ground level and check that it is perfectly horizontal using your spirit level. Rather than screwing the holes in once your plank is in place, make the holes beforehand. This can prevent the wood from splitting as there is less pressure on it. Use 3 screws per joint; ensure that they are in tightly and have not been stripped.
Once you have a bottom row of horizontal planks, add the top planks and then the middle. You should check the planks as you go to ensure that they are flush, and the others will fit in neatly.
QUICK TIP:
It's so much easier fitting planks in place if you use adhesive clamps before screwing them in. This keeps them in place and level and reduces the margin for error.
It's also a good idea to fit each section one at a time, just in case your measurements don't line up as you intended.
Fitting Vertical Planks In The Front
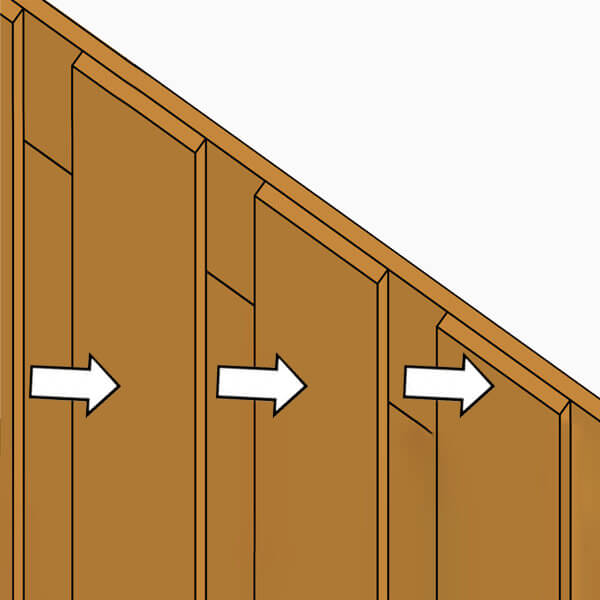
Always start with the vertical planks on the side of the fence that will be most visible. That way, you can ensure your most viewed side is perfect, and if there are any small errors, you can compensate for them at the back of the fence.
Fitting Vertical Planks At The Back
Once your front-facing planks are all up and screwed in place, you can move on to the back the fence. To begin, draw out a centreline between the front planks already in place and the new planks you'll be screwing in from the rear. This will give you an exact central starting point to work outwards from.
Then, check the alignment of your planks and begin screwing them into place. If you have any extra wood that sticks out and isn't plumb, simply cut it to size as you go.
Adding a Gate
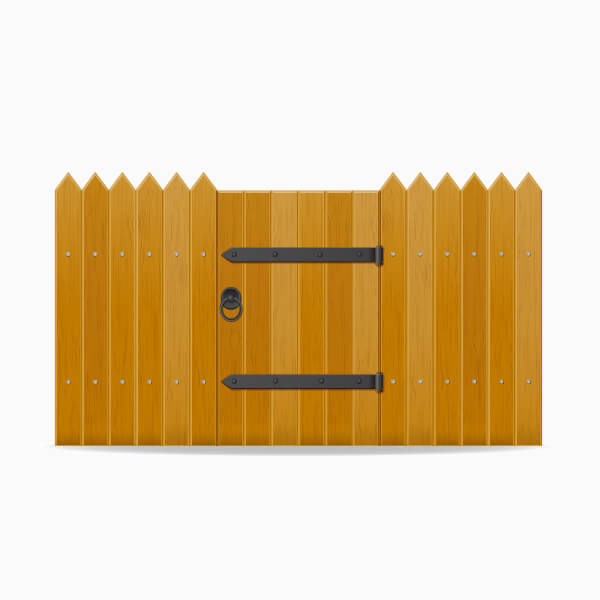
If you want to add a gate to your fence, it's a great idea to include this in the initial plan, but you can even add one after the fact. This may mean cutting away a section of your fence, but as you've made it from wood, you have the flexibility to do just that. You can even move a gate once installed by boarding up the section where it was, and opening up a new section to add it back in.
The standard width of a gate is 90cm, and the height should be the same as your fence, or slightly higher. You can always cut a gate down to size, but ensure that when you do, you do not take too much off as it should fit flush.
If you want to strengthen the gate and prevent your fence from flexing, you can fit 2 diagonal planks at 45-degree angles. The gate posts will be fitted the same way as your fence posts and can be reinforced, too, if required. If the gate is made from heavy wood, you can add 2 longer posts on either side and a cross beam to balance out the extra weight the fence will have to accommodate.
You can buy ready-made wooden gates or build your own in the same style as your fence. You'll need planks cut to size, hinges, a latch and nuts and bolts to complete the construction.
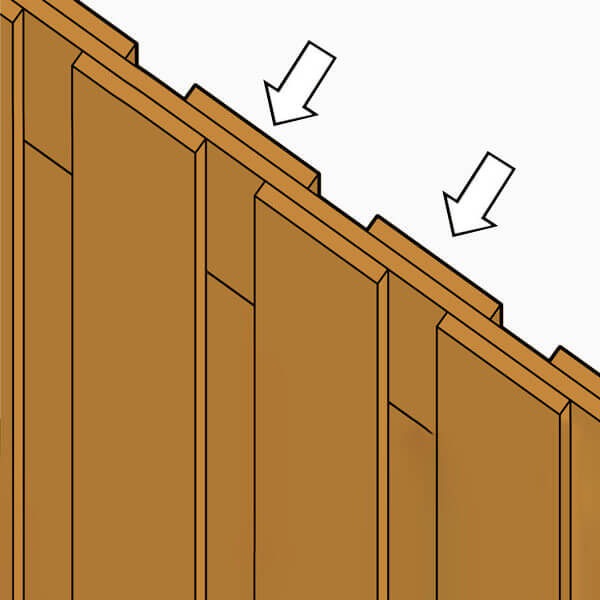
Adding End Caps
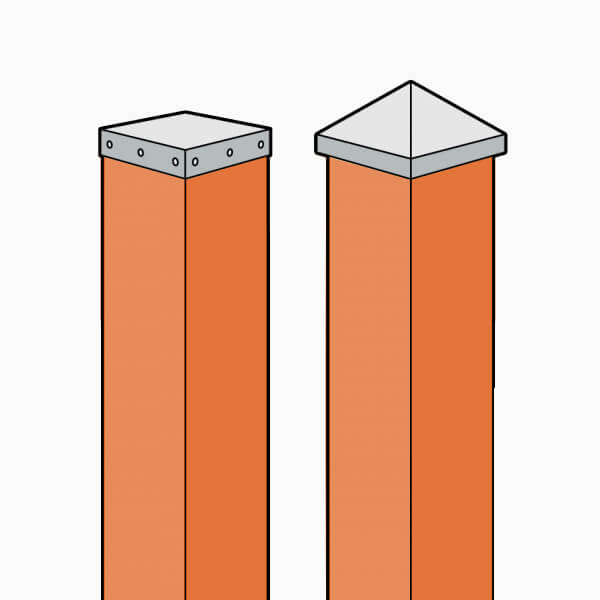
Now that your fence is complete - and you have even possibly included a gate - you'll need to put the end caps on your posts.
End caps prevent rainwater from seeping down into the wood and causing it to rot. Alternatively, you can affix a piece of roofing felt to the end of each post or cut them at an angle, so water runs downwards and does not collect on the surface at the top. Whatever option you choose, this is a critical stage, as leaving it out can cause your fence to rot from the inside out.
Painting, Varnishing or Sealing Your Fence
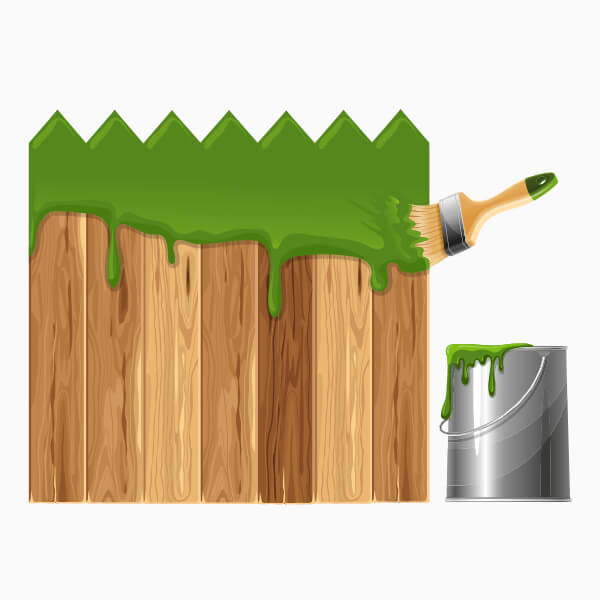
Wood is an easy material to work with, but it requires a sealant to protect it from the elements and keep it in good condition. With a fence, you have numerous options and can choose to oil it annually with linseed or other oil, to seal it with a sealant or varnish that is gloss or matte, or to paint it with gloss, satin or matte paint.
If you opt for the paint you are not limited to natural colours and can choose a shade that suits your house or the area in which you have erected your fence. Whatever option you go for, bear in mind that a wooden fence takes maintenance, and you may need to revarnish or repaint every few years to ensure that it stays looking as good as new, and the wood doesn't get damaged by the elements.
If you have any questions about building a fence or want to buy the necessary supplies, Buildworld is your one-stop-shop. We can help you start your project and ensure that you have everything you need to complete the construction process and build a fence that lasts.
Related Articles